Protein Peanut Butter Cup Ninja Creami
Bloom Savor >> Treats & Desserts>> Protein Peanut Butter Cup Ninja Creami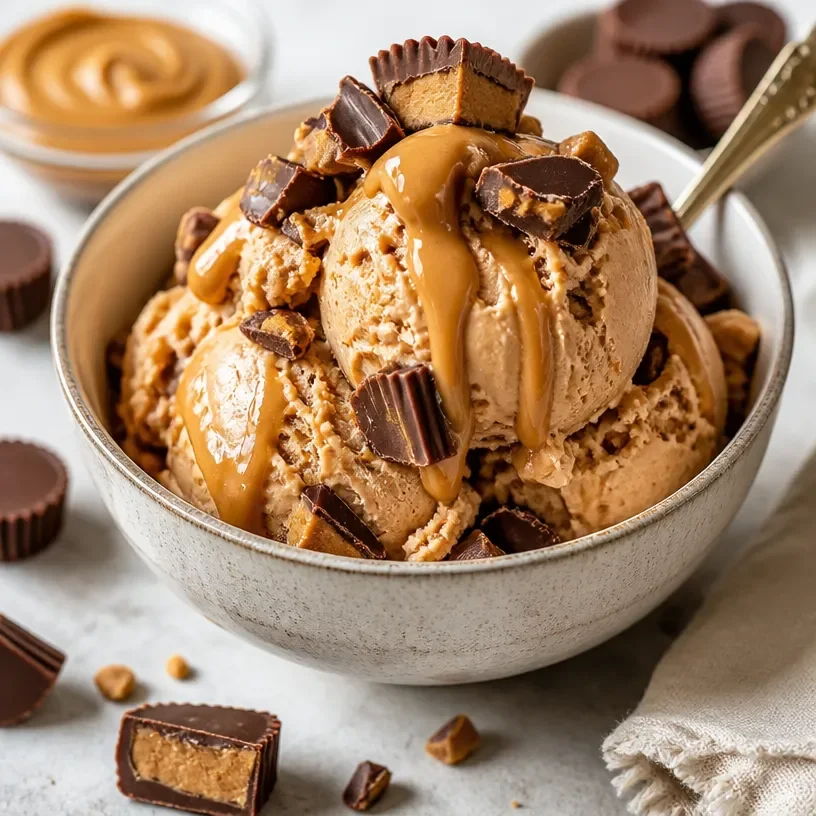
Protein Peanut Butter Cup Ninja Creami
Unleash Your Inner Dessert Ninja with Protein Peanut Butter Cup Ninja Creami
Welcome to BloomSavor! Today, we’re diving into a delightful treat that combines indulgence with a healthy twist—it’s my Protein Peanut Butter Cup Ninja Creami! This isn’t just another dessert; it’s a nostalgic nod to the peanut butter cups we all loved as kids, transformed into a nutritious, protein-packed treat that you can enjoy guilt-free! Whether you’re in need of an afternoon pick-me-up or a post-workout snack, this dessert has your back.
Imagine this: a warm summer afternoon, the sun is shining, and you’re hanging out with your best pals. The laughter is contagious, and the ice cream truck rolls by, ringing its cheerful bell. You rush to grab a treat, and those classic peanut butter cups are in hand. That first bite? Pure bliss! This recipe is here to bring back those sweet memories but with a twist that makes it both healthy and undeniably flavorful.
I remember the thrill of unwrapping those shiny golden wrappers, eager to dig into the smooth peanut butter center mixed with chocolatey goodness. It made those warm summer days even sweeter! With the Ninja Creami, I can recreate that nostalgic taste without all the guilt. Now, thanks to this incredible machine, you can whip up frozen desserts with your favorite healthy ingredients at home! So, let’s gather our ingredients and embrace the joy of cooking while making something truly delightful.
Ingredients
Here are the building blocks of our creamy delight:
-
Fairlife Milk (or Milk of Choice): Fairlife milk is ultra-filtered, which means it’s higher in protein and lower in sugar. Not a fan? You can use any plant-based or regular milk. Just note, different milks can slightly change the creaminess of your Ninja Creami dessert!
-
Greek Yogurt (or Cottage Cheese): Greek yogurt adds creaminess, protein, and a tangy flavor that balances out the sweetness. If you’re not a yogurt lover, cottage cheese blends well and provides similar benefits.
-
Protein Powder: Choose a flavor that complements your dish—chocolate works wonders here! If you’re vegan or prefer a plant-based option, there are great pea or brown rice protein powders available.
-
Flavor-Specific Ingredients: This could be peanut butter (creamy or crunchy), cocoa powder, or even vanilla extract for added flavor. These ingredients bring the classic peanut butter cup taste to life!
-
Natural Sweetener: Honey, maple syrup, or stevia work perfectly here. Adjust the sweetness according to your palate. If you’re controlling sugar intake, a few drops of stevia can do wonders!
Each ingredient plays a role in making this dessert rich, creamy, and oh-so-satisfying!
Step-by-Step Instructions
Let’s get cooking! Follow along for a creamy journey that’s as fun to make as it is to eat.
-
Gather Your Ingredients: Make sure you have everything at hand before you dive in. It helps to be organized in the kitchen, and trust me, it makes the process enjoyable!
-
Mix the Base: In a medium mixing bowl, combine 1 cup of Fairlife milk, ½ cup of Greek yogurt, and 1 scoop of your favorite protein powder. If you’re feeling adventurous, add a dash of vanilla extract or a spoonful of cocoa powder to enhance the flavor. Use a whisk to blend them until smooth. Pro tip: Mixing in a blender can make this even creamier!
-
Sweeten the Deal: Add your natural sweetener of choice to the mixture. Start with 2 tablespoons if you’re using honey or maple syrup, and adjust based on your taste preference. Don’t be afraid to sample a bit—this is your creation after all!
-
Incorporate Peanut Butter: Stir in ¼ cup of your chosen peanut butter. This is where the magic happens! If you love chunks, feel free to add crunchy peanut butter here. Mix until fully incorporated. You want to see those swirls of peanut butter throughout!
-
Pour and Freeze: Transfer your creamy mixture into the Ninja Creami pint container, leaving about an inch of space at the top (it will expand when freezing). Secure the lid and place it in the freezer for at least 24 hours. Now you just have to play the waiting game!
-
Blend It Up: Once frozen, remove the pint from the freezer. Install it into the Ninja Creami machine and select the “Lite Ice Cream” setting. Watch the magic unfold as it transforms your frozen base into a creamy delight!
-
Serve and Enjoy: Scoop your Protein Peanut Butter Cup Ninja Creami into a serving dish or cone and pop some extra peanut butter drizzle on top for an additional treat. You could also sprinkle some crushed dark chocolate or nuts if you’re feeling fancy!
Serving Suggestions
To make this dessert truly Instagram-worthy, consider serving it in special dessert bowls or waffle cones! Pair it with fresh fruit on the side, like banana slices or strawberries, for an extra pop of color and taste. You could also garnish with chopped peanuts or a dollop of cool whipped cream—whatever gets your taste buds tingling!
Recipe Variations
Ready to get creative? Here are a few variations to shake things up:
-
Chocolate Peanut Butter Swirl: Add a few tablespoons of melted dark chocolate or cocoa powder into your base for a richer chocolate experience.
-
Banana Nut Butter Delight: Toss in some mashed ripe bananas into the mix for a fruity twist. It pairs beautifully with peanut butter!
-
Nut-Free Version: Substitute the peanut butter with sun butter or tahini for an equally creamy, nut-free dessert.
-
Dairy-Free Delight: Use coconut yogurt and almond or oat milk to make it a dairy-free treat!
-
Jazzy Add-ins: Mix in some chocolate chips, mini marshmallows, or even crumbled granola for extra texture!
Chef’s Notes
I’ve been playing with variations of this recipe for years, tweaking ingredients and exploring flavor combinations. There was one time I added a bit of cayenne pepper for a spicy kick, which turned out to be surprisingly delightful! Remember, cooking is all about exploration, so don’t be afraid to embrace your inner chef with this recipe.
For me, this Ninja Creami dessert has become a staple in my rotation—perfect for when I’m craving something sweet, but still want to stay on track with my nutrition.
FAQs and Troubleshooting
Q: Why isn’t my Ninja Creami turning into ice cream?
A: This might happen if your mixture wasn’t frozen long enough. Make sure to freeze for a full 24 hours for the best results!
Q: Can I use a different type of sweetener?
A: Absolutely! Feel free to experiment with stevia, agave syrup, or any sweetener that you prefer. Just remember that liquid sweeteners will change the consistency slightly.
Q: How can I make this recipe even creamier?
A: Try adding more Greek yogurt or a splash of cream for a richer texture.
Q: Can I make this dessert without a Ninja Creami?
A: While the Ninja Creami works wonders for texture, you can blend your frozen mixture in a regular blender or food processor. Just be aware that the creaminess might not be as pronounced!
Nutritional Info (optional)
This Protein Peanut Butter Cup Ninja Creami is packed with protein, healthy fats, and delicious flavor, making it a great post-workout treat. Check out the approximate nutritional breakdown (per serving):
- Calories: 250
- Protein: 20g
- Fat: 10g
- Carbohydrates: 20g
- Sugar: 8g
Feel free to adjust based on your ingredient choices!
So there you have it—a simple, fun, and oh-so-delicious recipe that brings back those childhood memories while keeping things healthy. I can’t wait to see you whip up your very own Protein Peanut Butter Cup Ninja Creami! Don’t forget to share your creations with me on social media using #BloomSavor—let’s celebrate the joy of cooking and eating together! Here’s to many sweet moments ahead in your kitchen—now go get your ninja on!
Related Post
Holiday-Ready High-Protein Eggnog Spice Ice Cream for Ninja Creami
Festive Fuel: Create Your Own Protein Eggnog Spice Ninja CreamiAh, the festive season! There’s something…