Protein Dessert Flight with Ninja Creami: 5 Quick Treats
Bloom Savor >> Treats & Desserts>> Protein Dessert Flight with Ninja Creami: 5 Quick Treats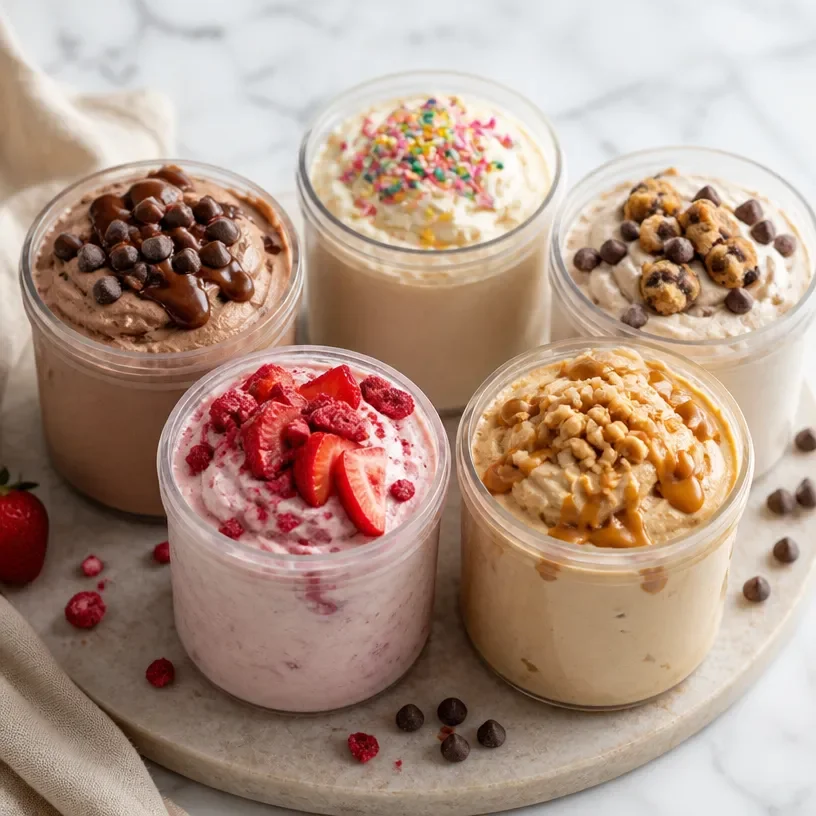
Protein Dessert Flight with Ninja Creami: 5 Quick Treats
Protein Ultimate Dessert Flight: A Delicious and Nutritious Sweet Treat
Welcome to BloomSavor, where good food feels joyous and accessible! Today, I’m about to take your healthy dessert game to a new height with the Protein Ultimate Dessert Flight using the Ninja Creami. This delightful treat is perfect for anyone who craves dessert but wants to make smarter choices without sacrificing flavor.
Imagine indulging in a creamy, dreamy dessert that’s packed with protein—sounds good, right? With just a little creativity and some top-quality ingredients, we can whip up a range of mouthwatering desserts that look and taste spectacular. Plus, they are simple to make, ensuring a delightful experience for both beginner and seasoned cooks alike.
Let’s dive into this adventure and create a Protein Ultimate Dessert Flight that will leave everyone asking for more!
A Sweet Memory
One of my fondest memories in the kitchen dates back to a hot summer afternoon when I was around ten years old. My mom decided we would make homemade ice cream from scratch. I remember the excitement bubbling up inside me as we whipped up a base of eggs, cream, and vanilla. It felt magical watching the mixture transform into soft, fluffy clouds as we poured it into the ice cream maker. The anticipation of tasting our creation was almost unbearable!
We ended up with two delicious flavors: classic vanilla and a decadent chocolate swirl. I will never forget the joy of scooping into those silky smooth creations. These moments of culinary adventure not only fostered a love for food in me but also deepened my relationship with my mom. Fast forward to today, and while I’ve upgraded to the Ninja Creami, the same joy and thrill of making incredible treats still pulses through my veins, especially with this Protein Ultimate Dessert Flight.
Ingredients
To create this protein-packed dessert flight, you’ll need the following ingredients:
-
Fairlife Milk (or milk of choice): This ultra-filtered milk is higher in protein and lower in sugar than regular milk. If you prefer a dairy-free option, almond or oat milk work nicely, too!
-
Greek Yogurt or Cottage Cheese: Both options are rich in protein and add creaminess to your dessert. Greek yogurt offers a tangy flavor, while cottage cheese provides a more subtle taste. You can also swap it out with skyr for a thicker texture.
-
Protein Powder: This ingredient is the backbone of our protein boost! Vanilla or chocolate protein powder works best for a delicious flavor, but feel free to use plant-based protein for a dairy-free version.
-
Flavor-Specific Ingredients: Depending on your chosen dessert, this may include fresh or frozen fruits, cocoa powder, nut butters, or flavor extracts like vanilla or almond. These will add layers of flavor and excitement to your dessert.
-
Natural Sweetener: Honey, maple syrup, or stevia can be used to sweeten your dessert without the need for refined sugars. Remember, less is more; you can always adjust to taste!
Let’s gather these ingredients and get started on our delightful dessert flight!
Step-by-Step Instructions
Step 1: Prepare Your Bases
Start by picking your flavor profiles. If you’re going for a chocolate dessert, mix together 1 cup of Fairlife milk, 1 cup of Greek yogurt, and 1 scoop of chocolate protein powder. For a fruity option, combine the same quantities using vanilla protein powder and fresh strawberries or peaches.
Chef’s Tip: Use a blender to mix the ingredients thoroughly—this ensures a smooth, creamy base. If you like to have fun with textures, leave a few small chunks of fruit for an added bite!
Step 2: Sweeten It Up
Next, add your natural sweetener to taste. Generally, 2-3 tablespoons of honey or maple syrup work wonders.
Chef’s Insight: If you’re unsure how sweet you want it, start with less. You can always adjust after tasting. Note that flavors will amplify as they freeze!
Step 3: Blend and Freeze
Pour your blended mixture into the Ninja Creami containers. Make sure you’re leaving the appropriate space for expansion.
Hack: For best results, freeze them overnight. If you’re in a rush, a solid four hours can work, too, but you won’t achieve that creamy texture!
Step 4: The Magic of the Ninja Creami
Once frozen, carefully remove your mixture from the freezer and insert it into the Ninja Creami. Turn it on to the “Ice Cream” setting and watch as it transforms into light and fluffy dessert wonder!
Pro Tip: If your dessert seems too hard to process, give it a few minutes at room temperature before running it through the machine.
Step 5: Serve Your Creation
Once your Protein Ultimate Dessert Flight is ready, spoon it into beautiful bowls or dessert cups. I love to garnish with fresh berries, a sprinkle of nuts, or even a drizzle of chocolate sauce!
Serving Suggestion: Create a dessert flight by offering small scoops of different flavors. It’s a showstopper at gatherings and ensures there’s something for everyone!
Recipe Variations
Feel like playing with flavors? Here are some creative twists:
- Chocolate Nut Delight: Add a tablespoon of almond butter to your chocolate base for a nutty twist!
- Tropical Paradise: Use coconut milk and add pineapple and mango for a refreshing tropical dessert.
- Berry Blast: Incorporate mixed berries in your vanilla base for a fruity explosion.
- Mint Chocolate Chip: Add peppermint extract and dark chocolate chips to your chocolate mixture for a refreshing take.
- Decadent Caramel: Incorporate caramel extract into your dessert and top with a light drizzle of caramel sauce!
Chef’s Notes
As I’ve perfected this recipe over the years, I’ve experimented with various flavors and textures. I fondly recall a kitchen mishap where I accidentally used cumin instead of cocoa powder in my first dessert flight attempt! The resulting creation had us in fits of laughter—not all experiments succeed, but they certainly make for great stories!
This Protein Ultimate Dessert Flight is versatile and allows for endless creativity. You can mix and match flavors based on what’s in season or what you have on hand. It’s such a joy to see how these simple ingredients come together and how satisfying they can be. Plus, it brings a wonderful sense of accomplishment making a dessert that you can feel proud of both in taste and nutrition.
FAQs and Troubleshooting
Q: Why is my dessert too icy?
A: This can happen if your mixture didn’t have enough liquid. Make sure to properly balance your fairlife milk and yogurt quantities.
Q: Can I use frozen fruit?
A: Absolutely! Frozen fruit can work incredibly well in these recipes and often leads to a creamier texture after processing.
Q: Can I meal prep these desserts?
A: For sure! Just freeze portions in individual containers, and you’ve got ready-to-go healthful desserts for the week!
Q: How do I store leftovers?
A: If you have any left, simply transfer to an airtight container and freeze. They can last for up to a month—but let’s be real, they probably won’t last that long!
Nutritional Info
While specific nutritional info can vary based on flavors and sweeteners used, a basic estimate could include:
- Approximately 200-250 calories per serving
- 15-30 grams of protein, depending on protein powder and added ingredients
- Lower in sugar than traditional desserts!
Whether you’re indulging yourself or sharing with friends, this Protein Ultimate Dessert Flight is a guilt-free way to enjoy something sweet while packing in healthy ingredients. Get ready to savor every bite and inspire your friends to hop on the healthy dessert train! Enjoy cooking, and don’t forget to share your creations with us at BloomSavor! Happy cooking!
Related Post
Beginner-Friendly Pumpkin Bread: 60-Minute Fall Bake
The Ultimate Classic Pumpkin Bread Recipe: Embrace the Flavors of Fall!As the leaves change and…