High-Protein Beef Baked Ziti for Weeknight Meal Prep
Bloom Savor >> Dinner Recipes>> High-Protein Beef Baked Ziti for Weeknight Meal Prep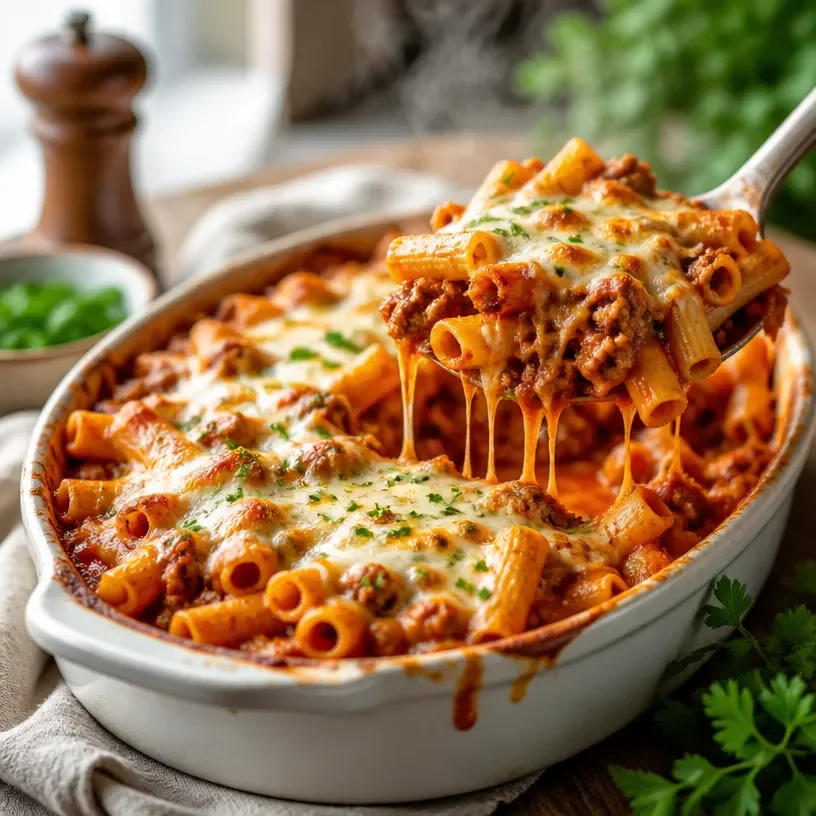
High-Protein Beef Baked Ziti for Weeknight Meal Prep
Savory Comfort: High-Protein Beef Baked Ziti
Welcome to BloomSavor, everyone! Today, we’re diving into a hearty family favorite that is both a warm hug on your plate and a high-protein powerhouse: High-Protein Beef Baked Ziti. If you’re searching for a dish that’s not only satisfying but also simple to whip up on a busy weeknight, this is the one! Picture golden layers of ziti intertwined with savory ground beef, a rich marinara sauce, and creamy cheeses—all baked to bubbly perfection. Whether you’re cooking for your family, hosting a casual dinner party, or prepping meals for the week ahead, this dish is sure to become one of your go-to recipes.
Now, let’s be honest—a good baked ziti brings back so many warm memories. Maybe it was Sunday family dinners or a cozy gathering with friends; whatever your story, this dish has a way of bringing everyone together. I remember the first time I made baked ziti for my friends. It was during my college years, and I somehow thought I could impress them with my “culinary skills.” Let me tell you, I definitely didn’t get there without a few mishaps! But when that bubbling casserole came out of the oven, it was a glorious sight—the cheesy, gooey, meaty aroma wafted through my tiny apartment, and everyone was lining up with their plates. It was a hit and paved the way for many more kitchen adventures!
Okay, enough nostalgia—let’s get cooking!
Ingredients
Here’s what you’ll need for your High-Protein Beef Baked Ziti, along with a few chef insights:
-
1 lb lean ground beef
- I recommend using lean ground beef (at least 90% lean) for a good protein punch without the extra fat. For a healthier option, you could swap it with ground turkey or chicken.
-
12 oz ziti
- Ziti’s tubular shape is perfect for holding onto that luscious sauce, but feel free to substitute with penne or rigatoni for a fun twist!
-
2 cups marinara sauce
- Homemade or store-bought; choose a good quality sauce for the best flavor. You can easily switch to a low-sodium version if you’re watching your salt intake.
-
1 cup cottage cheese
- This secret ingredient adds creaminess and protein! If you prefer a richer flavor, ricotta works beautifully as a substitute.
-
1 cup mozzarella cheese, shredded
- Mozzarella brings that delightful gooeyness! For a different flavor profile, try using smoked mozzarella or pepper jack for a bit of heat.
-
1/4 cup Parmesan cheese, grated
- Sprinkle this on top for a golden, crispy finish! If you don’t have Parmesan, Pecorino Romano will add a lovely salty kick.
Step-by-Step Instructions
Let’s get started! Cooking is all about enjoying yourself, so don’t rush—take your time, and let those delicious flavors shine!
-
Preheat the Oven
- Preheat your oven to 375°F (190°C). Starting with a hot oven creates that perfect baking environment for cheesy, bubbly goodness!
-
Cook the Ground Beef
- In a large skillet over medium heat, add the lean ground beef. Cook it until browned, breaking it apart with a wooden spoon until no longer pink. This should take about 5-7 minutes.
- Tip: Drain any excess fat if necessary. If you’re using lean beef, you might not have much to drain, but you want it flavorful, not greasy!
-
Add Marinara Sauce
- Pour in the marinara sauce to the skillet with the browned beef. Reduce the heat to low and let it simmer for about 5-10 minutes for developing those glorious flavors.
- Chef Hack: For a hint of sweetness, add a pinch of sugar or a splash of balsamic vinegar to balance the acidity of the sauce.
-
Cook the Ziti
- In a pot of boiling salted water, cook the ziti according to package instructions until it’s al dente (or just slightly undercooked, as it will continue cooking in the oven). Drain and set aside.
- Tip: Toss the drained pasta with a drizzle of olive oil to prevent sticking while it cools.
-
Mix in the Cheese
- In a large bowl, combine the cooked ziti, cottage cheese, half the mozzarella, and a sprinkle of Parmesan. Mix until everything is well incorporated.
- Chef Insight: This cheese mixture is where the magic happens—it brings creaminess and richness to every bite!
-
Layer It Up
- In a greased 9×13-inch baking dish, start layering. First, spoon half of the meat sauce on the bottom. Then, spread the ziti and cheese mixture on top. Finish with the remaining meat sauce and sprinkle the rest of the mozzarella and Parmesan on top.
- Pro Tip: A little sprinkle of Italian herbs (like oregano or basil) between the layers can add an extra burst of flavor.
-
Bake to Perfection
- Cover the baking dish with aluminum foil (shiny side down, so it doesn’t stick). Bake for about 20 minutes, then remove the foil and bake for another 10-15 minutes, or until the cheese is bubbly and golden.
- Pro Chef Hack: For an extra crispy topping, broil it for the last 2-3 minutes, but keep a close eye on it—cheese can go from golden to burned in a flash!
Serving Suggestions
Now that your High-Protein Beef Baked Ziti is fresh out of the oven, let it sit for about 5-10 minutes before serving. This will help the layers settle a bit. Serve it warm with a sprinkle of fresh basil or parsley on top to add a pop of color! Pair it with a crisp side salad or some garlic bread to soak up all that delicious sauce.
Recipe Variations
-
Veggie Loaded Ziti
- Add sautéed spinach, mushrooms, or zucchini for a healthy twist. This is an excellent option for sneaking in those veggies!
-
Spicy Italian Sausage
- Mix half of the ground beef with spicy Italian sausage for a zesty kick. Adjust the amount according to your heat preference.
-
Switch Up the Cheese
- Experiment with a mix of different cheeses such as goat cheese or provolone for an exciting flavor profile.
-
Dairy-Free Version
- For a lactose-free option, try using cashew cream instead of cottage cheese and sprinkle with dairy-free cheese.
-
Gluten-Free Ziti
- Use gluten-free pasta to adapt this comfort dish to meet dietary needs. You might even consider spiralized zucchini for a low-carb alternative!
Chef’s Notes
I’ve been making baked ziti for years, and it’s one of those recipes that only gets better when you play around with it! I’ve had my share of kitchen mishaps, like the time I forgot to add the cheese till it was almost done baking—don’t make my mistake! But honestly, one of the best parts of cooking is the journey and learning from every experience. I love grabbing a spoon and digging right into the dish for that first cheesy bite—it’s something really special!
FAQs and Troubleshooting
Q1: Why is my baked ziti dry?
- A: This can happen if it’s overcooked or if there wasn’t enough sauce. Try to keep an eye on it while baking, and ensure you use a generous amount of marinara.
Q2: Can I make baked ziti ahead of time?
- Absolutely! Assemble the ziti and cover it tightly in the fridge for up to 24 hours before baking. Just add a few extra minutes to the baking time since it will be cold.
Q3: Can I freeze baked ziti?
- Yes! Freeze before baking in an airtight container or wrap tightly in foil. When you’re ready to enjoy, simply thaw overnight in the fridge and bake as instructed.
Q4: How long can leftovers be stored in the fridge?
- Leftovers can be stored in an airtight container for up to 3-4 days. Just reheat individual portions in the microwave or a conventional oven for that fresh-out-of-the-oven taste!
Nutritional Info
A serving of High-Protein Beef Baked Ziti (1/6 of the total recipe) typically contains approximately:
- Calories: 450
- Protein: 30g
- Fat: 20g
- Carbohydrates: 45g
- Fiber: 3g
Don’t forget that these numbers can vary based on the ingredients you use, so it’s always good practice to double-check!
And there you have it—your High-Protein Beef Baked Ziti recipe is complete! I hope you find joy in making this dish, just like I do. It’s all about the memories we create around the table, so gather your loved ones, share a slice, and savor every bite. Happy cooking, friends—until next time at BloomSavor!
Related Post
Minute One-Pan Cheesy Ranch Beef Noodle Bake Casserole
Cheesy Ranch Beef Noodle Bake: A Cozy Culinary HugAh, the magic of home-cooked meals! There's…