Beginner-Friendly Maple Pumpkin Scones (One-Bowl Recipe)
Bloom Savor >> Treats & Desserts>> Beginner-Friendly Maple Pumpkin Scones (One-Bowl Recipe)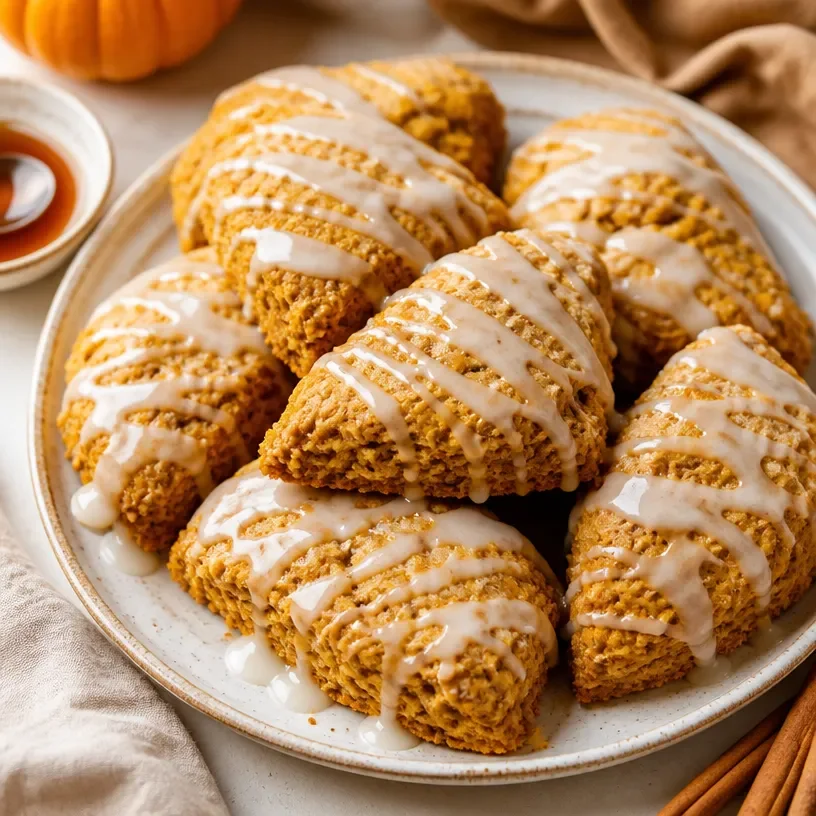
Beginner-Friendly Maple Pumpkin Scones (One-Bowl Recipe)
The Delightful World of Maple Pumpkin Scones
Welcome back, my culinary friends! It’s Olivia Hartwell from BloomSavor, and today we’re diving into a recipe that captures the heart of autumn: Maple Pumpkin Scones. As the leaves turn golden and the air becomes crisp, there’s nothing quite like the warm spices and sweet flavors of pumpkin to cozy up your kitchen. These scones are not just any ordinary treat; they are a celebration on a plate, bringing together the comforting notes of pumpkin and the subtle sweetness of maple syrup. So grab your apron and let’s get baking!
A Slice of Nostalgia
Let me take you back to my childhood, when fall meant more than just a change in the weather; it marked the arrival of pumpkin spice everything! I remember my grandmother’s cozy kitchen, the smell of cinnamon and nutmeg wafting through the air as she prepared her famous pumpkin scones for our Sunday brunches. Every bite was like a taste of home wrapped in nostalgia. We’d sit around the table, laughter filling the room, as we enjoyed those fluffy, fragrant scones drizzled with creamy maple glaze.
As I grew older, I wanted to recreate those cherished memories in my own kitchen. After a few trials, I landed on a recipe that not only mirrors Grandma’s but also captures my own twist with a splash of maple syrup. So, let’s journey together and make these delightful scones that are sure to bring everyone around the table for a joyful moment.
Ingredients
Here’s what you’ll need to whip up these scrumptious Maple Pumpkin Scones:
- 2 cups flour: All-purpose flour is perfect here, but whole wheat flour adds a rustic touch. Adjust your liquid if using whole wheat, as it can absorb more moisture.
- 1 tbsp baking powder: Essential for those fluffy layers! Be sure it’s fresh for the best rise—check the expiration date!
- 1/2 tsp salt: A pinch of salt enhances the flavors, balancing the sweetness of the maple and pumpkin perfectly.
- 2 tsp pumpkin spice: A blend of cinnamon, nutmeg, ginger, and cloves creates that signature fall flavor. If you want to customize, feel free to mix your spices!
- 1/2 cup cold butter: Chilled butter gives the scones that flaky texture. You can use vegan butter for a dairy-free version; just make sure it’s cold!
- 1/2 cup pumpkin puree: Look for pure pumpkin puree without additives. If you can’t find it, you can make your own by roasting and blending fresh pumpkin.
- 1 egg: This binds everything together. If you’d like an egg-free option, you can substitute with 1/4 cup of unsweetened applesauce.
- 1/4 cup maple syrup: Adds natural sweetness and depth. Go for pure maple syrup for the best flavor; it’s so worth it!
- 2 tbsp cream: Heavy cream creates a wonderful richness. For a lighter version, use cashew cream or even milk.
- 3/4 cup powdered sugar: Perfect for the glaze. You can control the sweetness by adjusting the amount or using a sugar alternative.
- 2 tbsp maple syrup: A drizzle on top of your glaze adds an irresistible maple twist!
Step-by-Step Instructions
Now, let’s get our hands floury! Follow these steps to create your Maple Pumpkin Scones:
-
Preheat the Oven: Set your oven to 400°F (200°C). Preheating ensures your scones rise beautifully and bake evenly.
-
Mix Dry Ingredients: In a large bowl, whisk together the flour, baking powder, salt, and pumpkin spice. This creates a wonderful base for your scones, and whisking aerates the dry mix—important for fluffy scones!
-
Cut in the Butter: Add the cold butter, cut into cubes. Using a pastry cutter or your fingers, blend until the mixture resembles coarse crumbs. Don’t worry if there are lumps; they create that layered flaky texture.
-
Combine Wet Ingredients: In a separate bowl, mix together the pumpkin puree, egg, and maple syrup. It’s like a fall hug in a bowl! Pour this mixture into the flour blend and stir until just combined. Be careful not to overmix—this helps keep the scones tender.
-
Form the Dough: Lightly flour your work surface. Turn the dough out and gently knead it a couple of times until it comes together. Pat it into a circle about 1-inch thick. Don’t stress about getting it perfectly smooth; imperfect is part of the charm!
-
Cut and Bake: Use a sharp knife or a pizza cutter to slice the dough into wedges. Place them on a baking sheet lined with parchment paper, leaving a bit of space between each scone. Bake for 15-20 minutes, or until they’re golden brown and a toothpick comes out clean.
-
Make the Glaze: While the scones cool, whisk together powdered sugar and maple syrup in a small bowl. Add a splash of cream to achieve your desired consistency. It should be pourable but not too runny!
-
Drizzle and Indulge: Once the scones are cool, drizzle the glaze over the top. Your kitchen will smell like the essence of autumn! (Pro tip: For a little extra flair, sprinkle some chopped pecans or walnuts on top of the glaze before it sets.)
Serving Suggestions
To serve these delectable Maple Pumpkin Scones, arrange them on a rustic wooden board or a simple white plate to highlight their vibrant, autumnal hue. Pair them with a warm cup of spiced chai or a latte for a cozy morning or afternoon treat. Trust me, your guests will appreciate the little touch of elegance you bring to the table!
Recipe Variations
- Chocolate Chip Delight: Fold in a 1/2 cup of dark chocolate chips for a rich contrast to the pumpkin flavors.
- Cranberry Citrus Burst: Add 1/2 cup dried cranberries and a teaspoon of orange zest for a refreshing twist.
- Nutty Sensation: Mix in 1/4 cup chopped pecans or walnuts directly into the dough for added crunch and flavor.
- Vegan Option: Substitute the egg with flaxseed meal (1 tbsp flaxseed meal + 3 tbsp water), and use plant-based butter and cream.
Chef’s Notes
These Maple Pumpkin Scones have become a staple in my kitchen, evolving over time into a beloved recipe that I share with friends and family. I remember one time during a particularly chilly October, I baked a double batch for a gathering. Little did I know, they were a hit! Everyone kept coming back for more, and we ended up enjoying them warmed up with vanilla ice cream as a dessert. Isn’t it amazing how food brings us together?
FAQs and Troubleshooting
-
What if my dough is too sticky?
If the dough is sticky, add a little extra flour—start with a tablespoon at a time until it’s workable. But remember, it’s better to have a slightly tacky dough than over-floured, as that can lead to dense scones. -
Can I use fresh pumpkin?
Absolutely! Just make sure your fresh pumpkin is roasted and pureed smoothly. If it’s too watery, press it in a cheesecloth to remove excess moisture. -
Why are my scones too dry?
Dry scones usually come from overworking the dough or baking too long. Be gentle when mixing and keep an eye on the scones during baking; they should be scone-sized, not muffin-sized! -
Can I make these ahead of time?
Yes! You can freeze the unbaked scone dough. Just shape it, wrap it well, and freeze. When you’re ready to bake, just pop them straight into the oven from the freezer—just add a couple of extra minutes to your baking time.
Now, roll up your sleeves, gather your ingredients, and let’s create some Maple Pumpkin Scones that will surely warm your heart and home this autumn season. Happy baking, my friends! 🍂✨
Related Post
High-Protein Pistachio Gelato: 4-Ingredient Creamy Treat
The Creamy Delight of Protein Pistachio GelatoHey there, fellow foodies! I’m thrilled you’ve decided to…