Apple Galette
Bloom Savor >> Treats & Desserts>> Apple Galette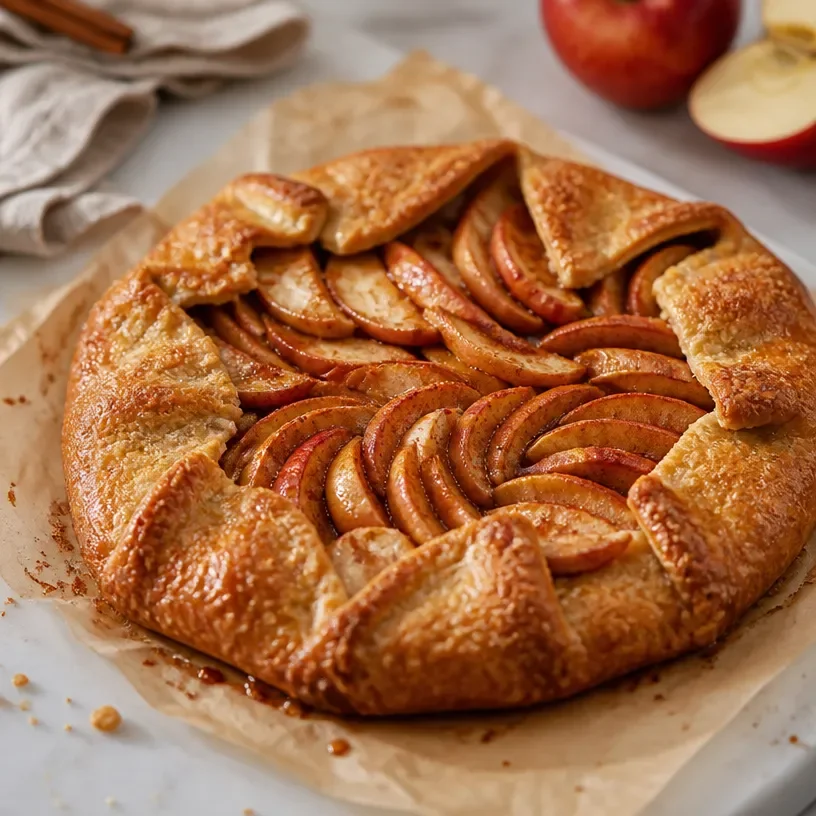
Apple Galette
A Warm Welcome to Fall: Making the Perfect Apple Galette
Hello, lovely foodies! Olivia here from BloomSavor, and I’m so excited to share one of my absolute favorite autumn recipes with you: the classic apple galette! This rustic dessert is not just visually appealing; it’s bursting with cozy flavors and a touch of nostalgia. If you’ve ever found yourself craving the sweet, spiced warmth of fall, this galette might just become your new go-to recipe.
As the leaves turn golden and the air becomes crisp, I think about how food brings us together—especially comforting dishes like this one. An apple galette embodies that perfect balance of simplicity and sophistication. It showcases seasonal apples in a flaky, buttery crust, making it the ultimate dessert for family gatherings, cozy nights in, or even as a surprise for your next dinner party.
Before we dive into the details, let me share a personal story that ties into this delightful dessert.
A Slice of Nostalgia
I’ll never forget the first time I made an apple galette. It was a crisp October afternoon, and the smell of cinnamon was dancing in the air as my grandmother and I baked together in her sun-kissed kitchen. We always had a plethora of apples from her backyard trees, and she taught me that the best pies and tarts are not about perfection. Instead, it’s about using fresh ingredients and letting their natural flavors shine.
While we rolled out the dough, she shared stories about her childhood—how she would pick apples with her siblings and how they used to help her mom bake pies during harvest season. There was love, laughter, and a sprinkle of flour that always seemed to land on my nose! That day, we created a galette so beautiful it didn’t just look good; it tasted like a hug from the inside.
Fast forward to today, and I find myself sharing this experience with all of you. I hope as you make this apple galette, you, too, will create beautiful memories in your kitchen, just as my grandma and I did.
Ingredients: What You’ll Need
Let’s grab our gear and get cooking! Here’s a quick list of what you’ll need for your delicious apple galette:
-
2 cups all-purpose flour
This is the backbone of our crust. Make sure to measure it correctly—spoon it into your measuring cup and avoid packing it down. For a gluten-free option, try using a 1:1 gluten-free flour blend. -
1/4 cup granulated sugar
This adds sweetness to the dough and helps with browning. If you prefer a less sweet crust, you can reduce the sugar to 2 tablespoons. -
1/2 cup cold unsalted butter
Cut into cubes. Cold butter is key to achieving that flaky texture. You can substitute with vegan butter for a dairy-free version! -
1 large egg
This will bind our dough together and add richness. For a vegan option, you can use flaxseed meal mixed with water (1 tablespoon flaxseed meal + 2.5 tablespoons water) as an egg replacement. -
1 tablespoon baking powder
This helps the dough rise a bit for a lighter texture. Make sure it’s fresh for the best results! -
1 teaspoon vanilla extract
Enhances the crust’s flavor. Feel free to use almond extract for a unique twist. -
2 teaspoons fall spices (cinnamon, nutmeg, etc.)
These warm spices scream autumn! Adjust according to your taste—more cinnamon for more warmth, or consider adding ginger for a zesty kick. -
About 4 medium-sized seasonal apples (like Granny Smith, Honeycrisp, or Fuji)
Sliced and ready to star in our galette! Choose a mix of sweet and tart apples for a complex flavor. -
1 tablespoon lemon juice
This will prevent the apples from browning and adds a bit of brightness to the flavor. -
Extra sugar for sprinkling
For that lovely finishing touch, a little sugar sprinkled on top before it goes in the oven will give you a caramelized crust.
Step-by-Step Instructions: Let’s Make Magic Happen!
Alright, let’s roll up our sleeves and get our hands a little messy! Here’s how to whip up your own apple galette.
-
Make the Dough
In a large mixing bowl, combine the flour, 1/4 cup sugar, and baking powder. Use a whisk to blend these dry ingredients evenly. Then, add the cold, cubed butter. Using a pastry cutter or your fingers, work the butter into the flour until it resembles coarse crumbs. Don’t worry if it’s not perfectly mixed; little bits of butter will create that lovely flakiness! -
Add Wet Ingredients
In a small bowl, beat the egg with the vanilla extract. Add this mixture to the flour and butter combo. Gently combine until the dough starts to form. If it feels too dry, add a teaspoon of cold water at a time until it comes together. Avoid overmixing; we want to keep it tender. -
Chill the Dough
Shape the dough into a disc and wrap it in plastic wrap. Refrigerate for at least 30 minutes. This step is crucial for a tender crust, as it allows the gluten to relax and the butter to firm up again. -
Prepare the Apples
While your dough is chilling, peel, core, and slice your apples into thin, even slices. It’s fun to mix different apple varieties for added flavor! Toss the slices with lemon juice, spices, and a sprinkle of sugar (about 2 tablespoons) to taste. Set them aside while your dough chills. -
Roll Out the Dough
Preheat your oven to 400°F (200°C). On a lightly floured surface, roll out your chilled dough into a rough circle, about 1/8-inch thick. Don’t worry about making it perfectly symmetrical; a rustic look adds charm! -
Assemble the Galette
Transfer your rolled dough onto a parchment-lined baking sheet. Pile the apple mixture in the center, leaving a 2-inch border. Carefully fold the edges of the dough over the apples, overlapping them as you go to create a beautiful fold. Brush the exposed dough with the remaining egg wash (beaten egg) and sprinkle with sugar. -
Bake
Pop the galette into the preheated oven and bake for about 35-40 minutes, or until the crust is golden brown and the apples are tender. The aroma filling your kitchen will be pure bliss! -
Cool and Enjoy
Once it’s baked, let the galette cool on the baking sheet for about 15 minutes before slicing it. Trust me; this is the hardest part—waiting. Serve it warm with a scoop of vanilla ice cream for an indulgent treat, or with a dollop of whipped cream for a lighter option.
Serving Suggestions: Plate It Up!
When it comes to serving your delicious apple galette, less is often more. I love to present it on a rustic wooden board, cut into wedges, and maybe even sprinkle a pinch of extra cinnamon over the top. Add a scoop of vanilla ice cream or some freshly whipped cream on the side to invite your guests to indulge. For that extra touch, perhaps drizzle a little salted caramel sauce on top. You can even add a few mint leaves or edible flowers for a pop of color!
Recipe Variations: Get Creative!
What I adore about apple galette is its versatility! Here are a few creative twists you can try when making your own:
- Nutty Add-Ins: Throw in some chopped pecans or walnuts with the apple filling for a delightful crunch.
- Different Fruits: Substitute half of the apples with pears or fresh berries for a unique flavor profile.
- Caramel Swirl: Drizzle some caramel sauce into the apple mixture before folding the dough over. Sweet and gooey goodness awaits!
- Herbal Elements: Infuse the apples with fresh herbs like thyme or rosemary for a surprising and savory note.
- Spiced Rum: Add a splash of spiced rum to the apple mixture for an adult twist! Just remember to adjust the sugar if you do.
Chef’s Notes: A Little Extra Love
As I evolved my baking skills, this recipe really became a canvas for my creativity. Initially, I stuck to Granny Smith apples for their tartness, but over the years I began experimenting with sweet and crisp varieties like Fuji and Honeycrisp, leading to a symphony of flavors! This galette has brought so many smiles around my table, and it never fails to impress those who try it.
Baking can be messy and imperfect, and that’s what makes it fun! If your galette doesn’t come out looking like it’s from a magazine, so what? The joy is in the process, the flavors, and the stories you create while making it. Plus, perfection isn’t necessary when it tastes this good!
FAQs and Troubleshooting: Let’s Keep It Real!
Here are some common questions and tips to ensure your apple galette turns out fabulous:
-
Why is my crust tough?
Avoid overmixing the dough! Too much handling activates the gluten in the flour, making it tough. Remember, we want it tender for that delightful flakiness! -
What if the apples release too much juice?
If you find your galette soupy, sprinkle a tablespoon of cornstarch on your apple mixture before adding it to the crust. This helps thicken the juices while baking. -
Can I use frozen apples?
Absolutely! Just be sure to thaw and drain them well to avoid excess moisture. You may need to extend the baking time a little. -
How do I store leftovers?
Cover any leftover galette with plastic wrap or store it in an airtight container in the fridge. It will keep well for 2–3 days—if it lasts that long!
Nutritional Info (Optional)
For those of you curious about calories or dietary needs, keep in mind that each slice of the apple galette (assuming eight slices total) has approximately:
- Calories: 250
- Fat: 12g
- Carbohydrates: 35g
- Protein: 3g
- Sugars: 10g
This can vary based on ingredients used, like the sugar levels and types of apples, but you get the idea!
There you have it—a warm, inviting, and utterly scrumptious apple galette recipe that’s perfect for any autumn gathering. I hope this serves as a reminder that cooking and sharing food should feel joyful and approachable. Don’t be afraid to make it your own and enjoy the process.
Thank you for joining me on this culinary adventure! I can’t wait to hear about your experiences with this recipe, so be sure to drop me a note or tag me on social media when you make your own apple galette. Happy cooking! 🍏❤️✨
Related Post
Pumpkin Chocolate Chip Bread
The Ultimate Pumpkin Chocolate Chip Bread: A Slice of Fall MagicAh, fall! That enchanting season…