Seasonal Pumpkin Coffee Cake: 30-Minute One-Bowl Comfort
Bloom Savor >> Treats & Desserts>> Seasonal Pumpkin Coffee Cake: 30-Minute One-Bowl Comfort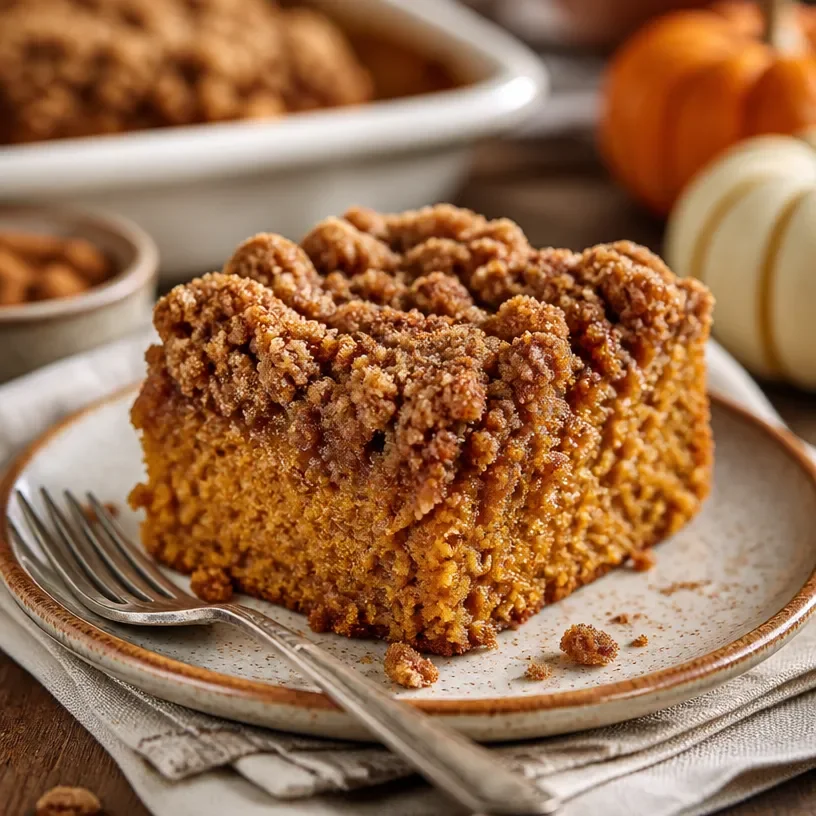
Seasonal Pumpkin Coffee Cake: 30-Minute One-Bowl Comfort
The Ultimate Pumpkin Coffee Cake Recipe: A Seasonal Delight
Hi there, fellow foodies! It’s Olivia Hartwell from BloomSavor, and today I’m spilling the beans on one of my all-time favorite recipes: Pumpkin Coffee Cake. This delightful treat is perfect for those cozy fall mornings when you want something sweet to pair with your cup of coffee or tea. So, grab your apron and let’s get cooking!
An Autumnal Memory
Picture this. It’s a crisp October weekend, and I’m back in my childhood kitchen, surrounded by the comforting aromas of pumpkin spice and warm baked goods. My mom would often whip up her famous pumpkin coffee cake, the recipe lovingly passed down through generations. I can vividly remember the sound of the mixer whirring away and the sound of laughter as we’d gather around the table, eagerly awaiting our slice of heaven. The golden brown cake topped with that irresistible crumbly streusel was something to behold—and to taste! That sweet, spiced aroma would draw us in like moths to a flame.
There’s something magical about baking that brings a family together. It’s not just about the cake itself; it’s about sharing moments, stories, and the joy that comes from creating something delicious. I still recreate that scene in my kitchen whenever I make it; it’s like a warm hug from the past. So, let’s dive into this awesome recipe that brings nostalgia and joy to our tables!
Ingredients
Here’s what you’ll need to make my scrumptious Pumpkin Coffee Cake:
-
2 cups all-purpose flour: The backbone of our cake. For a healthier option, you can substitute with whole wheat flour or a gluten-free blend.
-
1 tsp baking powder: This helps our cake rise—ensuring a fluffy texture. Always check the expiration date for optimal performance!
-
1/2 tsp baking soda: Another leavening agent that works wonders, especially in the presence of our acidic pumpkin.
-
1/2 tsp salt: A little pinch enhances all the flavors in the cake—don’t skip it!
-
2 tsp pumpkin spice: A delightful blend of cinnamon, nutmeg, and ginger that infuses our cake with all the cozy fall feels. If you’re in a pinch, you can make your own by mixing equal parts cinnamon and nutmeg.
-
1 cup canned pumpkin: Adds moisture and that beautiful orange hue. Canned works great, but roasted and pureed pumpkin is a lovely alternative if you’re feeling adventurous!
-
1/2 cup unsalted butter: This adds richness and flavor. If you’re looking for a dairy-free alternative, coconut oil or vegan butter works well.
-
3/4 cup packed brown sugar: This lends a molasses-like flavor and moisture. Feel free to switch to coconut sugar if you want a less processed option!
-
2 large eggs: Bind everything together. For a vegan swap, you can use flaxseed meal mixed with water as an egg substitute.
-
1/2 cup sour cream: Adds a wonderful tang and a moist crumb. Greek yogurt is a great substitute if you don’t have sour cream on hand.
-
Streusel topping:
- 3/4 cup all-purpose flour: A must for our crumbly topping—same substitution guidelines as above.
- 1/2 cup packed brown sugar: Caramelizes beautifully when baked.
- 1 tsp cinnamon: Because more cinnamon means more deliciousness!
- 5 tbsp unsalted butter: Keeps the streusel airy.
Step-by-Step Instructions
Now that we’ve got our ingredients, let’s whip up this pumpkin coffee cake! Here’s how to do it step by step.
-
Preheat the Oven: Set your oven to 350°F (175°C). Preheating is crucial! This ensures your cake bakes evenly from the get-go.
-
Prepare the Pan: Grease and flour a 9×13-inch baking pan. For extra flavor, you can also line the bottom with parchment paper—it’ll come out perfectly, and cleanup is a breeze.
-
Mix the Dry Ingredients: In a medium bowl, whisk together the flour, baking powder, baking soda, salt, and pumpkin spice. This ensures even distribution of all the leavening agents and spices. Tip: Sifting your dry ingredients can avoid clumps and make the cake even lighter!
-
Cream the Butter and Sugar: In a large bowl, beat the butter and brown sugar with a hand mixer (or a stand mixer if you’re feeling fancy!) until it’s fluffy and light—about 4-5 minutes.
-
Add the Eggs and Pumpkin: Mix in the eggs, one at a time, ensuring each is fully incorporated before adding the next. Then, stir in the canned pumpkin. This is where the magic happens; that beautiful orange color will make you smile!
-
Incorporate the Sour Cream: Gently fold in the sour cream until well combined.
-
Combine Wet and Dry Ingredients: Gradually add the dry ingredients to the wet mixture, stirring until just combined. Don’t over-mix; we want a tender cake!
-
Prepare the Streusel: In a separate bowl, mix together the flour, brown sugar, and cinnamon for the streusel topping. Cut in the butter until you have a crumbly mixture. Pro tip: Using your hands is often the best way to make streusel!
-
Assemble the Cake: Pour half of the batter into the prepared baking pan, then sprinkle half of the streusel topping. Pour the remaining batter on top and finish with the rest of the streusel.
-
Bake: Pop the cake in the oven and bake for about 30–35 minutes until a toothpick inserted in the center comes out clean. The smell wafting through your kitchen will be out of this world!
-
Cool and Serve: Allow the cake to cool in the pan for a few minutes before transferring to a wire rack. Let it cool slightly before slicing into squares!
Serving Suggestions
To serve, slice the coffee cake into squares and arrange them on a beautiful platter. Dust some powdered sugar over the top for a touch of elegance, or serve with a dollop of whipped cream or a scoop of vanilla ice cream—it’s that good! Pair it with your favorite beverage for a true treat.
Recipe Variations
- Nutty Crunch: Add 1/2 cup of chopped walnuts or pecans to the streusel for a satisfying crunch.
- Chocolate Lovers: Stir in a handful of chocolate chips into the batter for a decadent twist!
- Maple Glaze: Drizzle a simple maple glaze (powdered sugar mixed with maple syrup and a splash of milk) over the cooled cake for an additional layer of flavor.
- Dairy-Free: Swap out the butter for coconut oil and use dairy-free yogurt instead of sour cream for a dairy-free version.
- Spiced Up: For an extra kick, add a pinch of cayenne or black pepper to the pumpkin spice mix!
Chef’s Notes
As with any recipe, don’t be afraid to make it your own! This pumpkin coffee cake has evolved over the years in my kitchen, and I’ve added all sorts of fun tweaks to suit our seasonal cravings. One year, I even added in some grated apple for extra moisture, and it was a hit! So, play around and see what delicious combinations you can come up with!
FAQs and Troubleshooting
1. My cake came out dense; what did I do wrong?
This can happen if you over-mixed your batter or if your leavening agents (baking powder and baking soda) are old. Make sure to mix until just combined and check those expiration dates.
2. Can I use fresh pumpkin instead of canned?
Absolutely! Just make sure to roast and thoroughly puree your pumpkin until it’s smooth. Fresh can sometimes be a bit wetter than canned, so you might need to adjust the flour slightly.
3. How do I store leftover cake?
Keep any leftover cake tightly covered at room temperature for up to 3 days or in the fridge for up to a week. To freeze, wrap in plastic wrap and then foil for up to 3 months.
4. Can I make this coffee cake in advance?
Definitely! It holds up well and is even better the next day. You can bake it a day ahead and let it sit covered at room temperature overnight.
Nutritional Info
While I’m not a nutritionist, here’s a rough estimate per slice (based on 12 servings):
- Calories: 250
- Fat: 10g
- Carbohydrates: 38g
- Fiber: 1g
- Protein: 3g
Feel free to adjust depending on your ingredient choices, especially if you go for healthier subs!
So there you have it! A delicious pumpkin coffee cake recipe that’s bursting with flavor and steeped in nostalgia. I hope this brings a little more joy to your kitchen and inspires you to share it with family and friends. Don’t forget to snap a pic of your creation and tag @BloomSavor. Happy baking, and enjoy those cozy moments!
Related Post
Protein Mocha Fudge Ninja Creami
Protein Mocha Fudge Ninja Creami: A Deliciously Fun Twist on Dessert!Welcome to the vibrant world…